How to Make a Shirt in Roblox: A Comprehensive Guide to Designing, Testing, and Uploading
May 26, 2025
Read: What Does AFK Mean in Roblox?
Read: What is Roblox GG? Everything You Need to Know
Creating custom shirts in Roblox is an excellent way to express your creativity and potentially earn Robux by selling your designs. Whether you're aiming to design a simple graphic tee or a detailed, realistic shirt, this guide will walk you through every step—from understanding the template to uploading your creation.
Understanding the Roblox Shirt Template
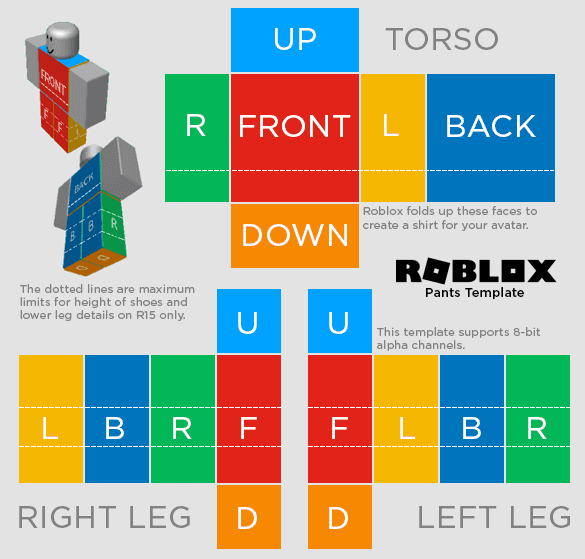
Roblox shirts are designed using a specific template that wraps around the avatar's body. The template consists of various sections, each corresponding to a part of the avatar's body. Here's a breakdown of the template:
Torso: Front, back, left side, right side, top, and bottom.
Arms: Left and right arms (front and back).
Legs: Left and right legs (front and back).
Each section is represented in a 2D layout, which, when applied to the avatar, wraps around to form a 3D shirt. Understanding this layout is crucial for accurate design placement.

Designing Your Shirt
Step 1: Download the Shirt Template
Navigate to the Roblox Create Page: Go to the Roblox Create page.
Access the Shirt Template: Under the "Shirts" section, find and download the official shirt template. This will be a PNG file that you can edit using graphic design software.
Step 2: Choose Your Design Software
Select a graphic design program that you're comfortable with. Some popular options include:
Adobe Photoshop: Offers advanced features for detailed designs.
GIMP: A free alternative with robust capabilities.
Paint.NET: A user-friendly option for beginners.
Step 3: Edit the Template
Open the downloaded template in your chosen design software. Here's how to proceed:
Create a New Layer: This will be your design layer.
Design the Shirt: Use the template's sections as guides to place your designs accurately. Remember, the front of the torso corresponds to the front section of the template, and so on.
Add Details: Incorporate elements like logos, patterns, or text. Ensure that your design aligns with Roblox's community guidelines.
Step 4: Save Your Design
Once satisfied with your design:
Save the File: Export your design as a PNG file to maintain transparency.
Name the File: Choose a descriptive name for your shirt.
Testing Your Shirt Design
Before uploading your shirt to Roblox, it's essential to test how it appears on an avatar to ensure it looks as intended.
Using Roblox Studio:
Open Roblox Studio: Launch Roblox Studio and create a new project.
Insert a Character Model: Use the "Rig Builder" to insert a character model.
Apply the Shirt:
Select the character model.
In the "Explorer" window, find the "Shirt" object.
In the "Properties" window, click on the "ShirtTemplate" property and upload your PNG file.
Preview the Shirt: Observe how your shirt fits on the avatar and make any necessary adjustments.
Using Online Tools:
Alternatively, you can use online tools to preview your shirt design:
In-Game Clothing Previewer: This website allows you to upload your shirt design and preview it on different body types before uploading to Roblox.
Uploading Your Shirt to Roblox
Once you're satisfied with your design and its appearance on the avatar, it's time to upload it to Roblox.
Step 1: Prepare Your Account
Roblox Premium: To sell shirts, you need a Roblox Premium membership. Without it, you can only wear the shirt on your avatar.
Robux: Uploading a shirt costs 10 Robux. Ensure you have sufficient funds in your account.
Step 2: Upload the Shirt
Go to the Create Page: Navigate to the Roblox Create page.
Select Shirts: Under the "Shirts" section, click on "Upload Shirt."
Choose Your File: Select your PNG file and give your shirt a name.
Upload: Click "Upload for 10 Robux."
Step 3: Configure Sales (Optional)
If you want to sell your shirt:
Access the Shirt's Settings: After uploading, go to your shirt's page.
Configure Sales:
Click on the gear icon and select "Configure."
Go to the "Sales" tab.
Toggle "Item for Sale" to "On."
Set your price (minimum 5 Robux for shirts).
Click "Save."
Tips for Successful Shirt Design
Stay Within Guidelines: Ensure your design adheres to Roblox's community standards.
Test on Different Body Types: Roblox avatars come in various shapes and sizes. Test your design on different body types to ensure compatibility.
Seek Feedback: Share your design with friends or the Roblox community to get constructive feedback.
Updating Your Shirt Design
If you wish to make changes to your shirt after uploading:
Edit the PNG File: Make the desired changes in your design software.
Re-upload the Shirt: Follow the upload process again. Note that re-uploading will replace the existing shirt, and any sales data will be reset.
Frequently Asked Questions (FAQs) About Making Shirts in Roblox
1. What is the difference between a shirt and a T-shirt in Roblox?
Answer:
In Roblox, shirts and T-shirts are two different types of clothing items:
Shirts use the full Roblox shirt template and wrap around the avatar's torso. These are customizable and allow for advanced designs (front, back, sleeves, etc.).
T-shirts are simply images placed on the front of an avatar’s torso and do not wrap around. T-shirts are easier to make and do not require a template.
2. Do I need Roblox Premium to upload or sell shirts?
Answer:
Yes. While any user can create and upload a shirt (with a 10 Robux fee), you must have a Roblox Premium membership in order to sell the shirt and earn Robux from it.
3. How much does it cost to upload a shirt on Roblox?
Answer:
Uploading a shirt costs 10 Robux. This fee is charged whether you intend to wear it privately or sell it on the marketplace.
4. Can I make a shirt on mobile?
Answer:
Technically, yes, but it’s not recommended. Creating a shirt requires precise image editing using a template, which is much easier to do on a PC or Mac using software like Photoshop, GIMP, or Paint.NET. Mobile devices typically lack the tools required for complex editing.
5. Why is my shirt not appearing correctly on the avatar?
Answer:
This could be due to several reasons:
The template wasn't followed properly (parts might be misaligned).
The image resolution or dimensions may be incorrect. Make sure it's 585 x 559 pixels.
Transparency issues or wrong file format (must be PNG).
Use Roblox Studio to preview how it looks before uploading to ensure it wraps around the model properly.
6. How long does it take for a shirt to be approved by Roblox?
Answer:
After uploading, shirts are typically reviewed within minutes to hours. However, in some cases, it may take up to 24 hours. If the shirt violates Roblox’s community standards or includes inappropriate content, it may be rejected or moderated.
7. Can I change a shirt after uploading it?
Answer:
No, you cannot edit an existing uploaded shirt. If you want to make changes, you’ll need to re-edit the PNG file and upload it again as a new shirt, which will cost another 10 Robux.
8. What dimensions should my Roblox shirt be?
Answer:
The official dimensions for a Roblox shirt template are 585 pixels wide by 559 pixels tall. Make sure your file matches these exact dimensions and is in PNG format.
9. Can I use copyrighted logos or brands on my shirt?
Answer:
No. Roblox does not allow the use of copyrighted material on user-created clothing. Using brands, logos, characters, or designs you do not own may lead to your shirt being removed or your account being moderated.
10. How do I make my shirt sell better or stand out?
Answer:
Create original designs that look professional.
Use color theory and trendy styles popular among Roblox users.
Take advantage of communities or groups to promote your shirt.
Add a detailed and appealing description and a high-quality thumbnail image.
Participate in events or trends within Roblox to align your designs with user interests.
11. Can I give someone my shirt for free?
Answer:
Roblox does not support direct gifting of clothing items. However, you can set the shirt's price to 5 Robux (the minimum), and if you're in the same group, you can make the shirt free to group members by configuring the group store settings.
12. Is there a way to test a shirt before uploading it publicly?
Answer:
Yes. You can use Roblox Studio to upload and preview the shirt on a dummy model. This way, you can test placement, fit, and design alignment before paying the upload fee.
13. What happens if I upload an inappropriate shirt?
Answer:
Roblox has a strict moderation system. Uploading inappropriate content may result in:
The shirt being removed.
A warning or temporary suspension.
Permanent banning for repeated or severe violations.
Always ensure your shirt design complies with Roblox's Community Standards and Terms of Use.
14. Can I use AI or online tools to generate shirt designs?
Answer:
Yes, you can use AI or image generators as a starting point, but be cautious:
Make sure the final design is your original work or is modified enough to avoid copyright issues.
Double-check that the generated image fits the Roblox template layout properly.
15. How can I get more exposure for my shirts on Roblox?
Answer:
Promote on Roblox groups and social media platforms.
Offer themed shirts for events, holidays, or trends.
Include relevant keywords in your shirt title and description.
Consider creating a group or brand identity and uploading related merchandise.
Conclusion
Creating and uploading a shirt in Roblox is a rewarding process that allows you to express your creativity and potentially earn Robux. By following this guide, you can design shirts that stand out and appeal to the Roblox community. Remember to keep experimenting, stay updated with Roblox's guidelines, and most importantly, have fun with your designs!
Read: Beginner's Roblox Guide for Kids: How to Get Started with the Ultimate Game Creation Platform
Read: How to Enhance Your Roblox Skills: A Beginner’s Guide to Mastering Roblox Game Development
Read: Essential Skills Kids Learn from Roblox: A Fun and Educational Gaming Platform
Read: 10 Tips to Become a Roblox Expert This Summer
Read: What to Do in 2025 If Your Kids Love Minecraft or Roblox: Ultimate Guide for Parents
More blogs